In today’s digital age, video content is king. Whether you’re creating marketing material, educational content, or entertainment, reaching a broader audience is crucial. One effective way to achieve this is by adding subtitles to your videos. Subtitles not only enhance accessibility for the hearing impaired but also cater to non-native speakers and improve engagement in noisy environments. This guide will walk you through the entire process of adding subtitles to your videos, from the basics to advanced tips.
Why subtitles matter
Accessibility
Subtitles are essential for making your content accessible to people with hearing impairments. This inclusivity is not just a social responsibility but also expands your audience base.
Broader Audience
With subtitles, non-native speakers can understand your content better, allowing you to reach a global audience.
Engagement
Subtitles can keep viewers engaged, especially in noisy environments where the audio might not be clear.
SEO Benefits
Adding subtitles can improve your video’s SEO. Search engines can index subtitles, making your video more discoverable.
Types of subtitles
Open Subtitles
These are embedded into the video file and cannot be turned off. They are always visible to the viewer.
Closed Subtitles
These can be turned on or off by the users. They are usually found on platforms like YouTube, where users can choose to enable or disable subtitles as needed.
Tools and Software for Adding Subtitles
Free Tools
- YouTube Subtitles: YouTube provides a straightforward way to add subtitles to your videos.
- Amara is an open-source tool for adding subtitles to videos.
- Aegisub is a free, cross-platform open-source tool for creating and editing subtitles.
Paid Tools
- Adobe Premiere Pro is a professional video editing tool with robust subtitle features.
- Final Cut Pro is a powerful tool for Mac users that offers extensive subtitle options.
- Camtasia is user-friendly screen recording and video editing software that includes subtitle capabilities.
Step-by-Step Guide to Adding Subtitles
Step 1: Transcribe your video
The first step in adding subtitles is creating a transcript of your video. This can be done by the user manually or using automated transcription services.
Manual Transcription
While time-consuming, manual transcription ensures accuracy. Play the video and type out the dialogue as you go.
Automated Transcription
Tools like Otter.ai or Trint can transcribe your video quickly. However, always review and edit the automated transcript for accuracy.
Step 2: Create a subtitle file.
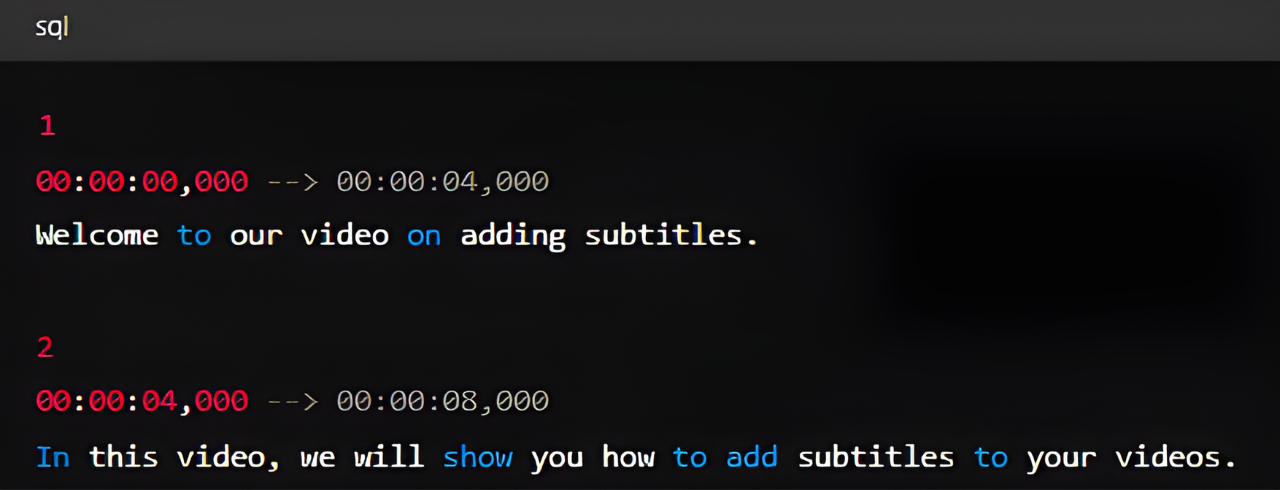
Subtitle files are usually in formats like SRT, VTT, or ASS. SRT (SubRip Subtitle) is the most commonly used format.
Example of an SRT File:

Step 3: Sync subtitles with your video
The next step is to synchronize the subtitles with your video. This involves setting the correct start and end times for each subtitle.
Using Aegisub
- Open your video. Load your video into AegiSub.
- Import the transcript: Paste your transcript into the subtitle editor.
- Set timings: Play the video and set the start and end times for each subtitle line.
Step 4: Add Subtitles to Your Video
Using YouTube
- Upload your video: Upload your video to YouTube.
- Add subtitles: Go to the subtitles section in YouTube Studio.
- Upload your subtitle file: Select the SRT file you created and upload it.
- Review and adjust: Use YouTube’s subtitle editor to make any necessary adjustments.
Using Adobe Premiere Pro
- Import your video: Load your video into Premiere Pro.
- Create a new caption track: Go to the Captions and Subtitles section and create a new caption track.
- Import your subtitle file: Load your SRT file into Premiere Pro.
- Sync and adjust: Use the timeline to ensure subtitles are properly synced with the audio.
Step 5: Export Your Video
After adding and synchronizing your subtitles, export your video in the desired format. Ensure that the subtitle settings are correct during export to retain them in the final video.
Advanced Tips for Subtitling
Styling Subtitles
Styling your subtitles can enhance readability and aesthetics. Use a font and size that are easy to read, and ensure sufficient contrast with the video background.
In Adobe Premiere Pro:
- Change font and size: Customize the appearance of your subtitles in the Essential Graphics panel.
- Add background: Include a semi-transparent background to make the text stand out against various video scenes.
Subtitles for Multiple Languages
To cater to a global audience, consider adding subtitles in multiple languages. YouTube allows you to upload multiple subtitle tracks for different languages.
Accessibility Considerations
- Positioning: Ensure subtitles do not obstruct important visual elements.
- Color contrast: Use high-contrast colors to enhance readability.
- Test your subtitles: Always review your subtitles on different devices and screen sizes to ensure they are legible.
Common Challenges and Solutions
Syncing Issues
Subtitles that are out of sync can frustrate viewers. Use tools with good synchronization features, and always review the timings.
Accuracy
Automated transcription services can make mistakes. Always review and edit the transcriptions to ensure accuracy.
Technical Issues
Different video players and platforms have varying support for subtitle formats. Ensure your chosen format is compatible with the intended platform.
Conclusion
Adding subtitles to your videos is a powerful way to enhance accessibility, reach a broader audience, and improve viewer engagement. By following the steps outlined in this guide and leveraging the right tools, you can create professional-quality subtitles that enrich your video content. Remember, the effort you invest in subtitling not only demonstrates a commitment to inclusivity but also significantly boosts the impact and reach of your videos. Happy subtitling!

